Posts

Showing posts from September, 2018

Happiness is Homemade - Autumn Gifting | Mulling Spice Recipe

Image
Isn't it fun to give just because? I find that Autumn brings out the gifting spirit in my soul and all I want to do is shower everyone with goodies! Especially home-made goodies :) And one of my favorite fall gifts is homemade mulling spice pouches, which are super quick and easy to pull together, but are such a tasty and fun treat to share with loved ones. I've included my quick recipe below, but first let's chat about the itty bitty pocket.  To start the pocket, I used a bit of soft yellow cardstock and PTI's Seed Packet die . Around the edges, I stamped, PTI's Stitch in Time borders in two different embossed colors, white and soft yellow. To the top of the card I added a few bows, one made of paper, one of felt and another colorful embroidered trim.  For the sentiment, I used PTI's Petite Places: Home and Garden stamps, stamped and embossed in Rose Quartz .  For the adorable pie, I used an older Spellbinders die set, but you could just as easily use this cute...

Thank You - Three Ways to Add Simple Layering

Image
It's such a happy, sunny day here. I hope it's much the same wherever you are.  Thanks so much for visiting today - I have in store for you a very simple and fun card, with a few techniques I've been loving lately. It involves die-cuts, vellum and double-embossing, so let's get started! I have been drawn to embossing quite a bit, and especially loving the layers that can be achieved with this technique. For some tips on layering with embossing, check out this post I did a while back.  For this card, I used the same technique, to add many different textures and colors. I was inspired by a really beautiful Moroccan rug, and wanted to emulate the design and colors. I used Papertrey Ink's Southwestern Style stamp which is no longer available, but I looove this set  along with this set , for an awesome switch up. Or you could use this PTI set (but it's a last-call item, and will likely not be around for much longer). I stamped all of my borders on vellum, for some...

No Place Like Home - Switch Up on Holiday Colors

Image
Hi Friends!  I'm sharing a card today that I just love because of the unusual colors, given the theme of the card. With the holidays fast approaching (especially Thanksgiving here in Canada), I've got holiday cards on my mind. But this time around, I wanted to incorporate a bit of a different palette - one that I wouldn't typically use this time of year. I found that with a few little tweaks, it actually works pretty well. Whaddya think? To start this card, I used a white card base. The first tip about taking brighter hues into the fall season, is to actually season your whites! Yes, you read that right!  Instead of leaving whites as they are, I add just a smidge of tan, brown, or grey ink to the edges, and it instantly gives the card not only an aged look, but a much more fall-appropriate look. Don't you think? Next up, when using greens, I love using warmer hues as they really emulate the golden harvest sun on those last few remaining green leaves. And then I build my...

Love You So Mush - How to Layer with Heat Embossing + Altenew SALE

Image
Good morning!  How are you all doing today? I hope your week has been full of creativity. Today, I'm sharing a card that I've been meaning to do for some time now. It's probably been done before, but the idea came upon me when I was stamping with multi-layer stamps, thinking how fun it would be to add more dimension with a bit of embossing. I find this technique especially fitting for Autumn cards, where layers evoke so much coziness. And it's such a fun way to stamp on colored cardstock :) I am also very, very excited to share with you my most recent favorite stamp...which just so happens to be on SALE for a limited time ;) So here we go! Altenew SALE! Before we get into the nitty gritty, SB.com is having a huge sale on Altenew products over the next three days. The sale is happening until midnight, Thursday Sept. 20th and most of the stamps are 20% off or more! My favoritest, cutest little mushroom stamp used above is only $12 right now! And so are way too many others...

Wishing You a Wonderful Thanksgiving - Autumn Cards with Non-Traditional Colors

Image
Our Thanksgiving is approaching quickly, yet I'm still in a very Summer-y state of mind.  So I thought it would be fun to adapt a colorful palette just a bit and bring out some Autumn accents. The first thing I think of when cooler weather approaches is chunky, cozy layers, and this lovely canvas base is the perfect way to add a bit of textured cozyness to my card. But keeping in mind fresh floral hues, I also added two patterns in feminine colors: this pretty Pinkfresh print , and this sweet floral print. For the topper, I added a striped bow ( DIY tutorial here ), and also a sweet vintage button. I stamped a portion of my sentiment using Purls of Wisdom stamps from Papertrey. They are discontinued, but since this is such a generic saying, it would be really easy to use an alternative. I really love adding a touch of sparkle to holiday cards, so I used a really delicate font to die cut a gorgeous glitter cardstock . I prefer to use cardstock when working with such fine details, as...

Queen and Co. Merry and Bright Ornament Kit - What to Do with Shaker Leftovers

Image
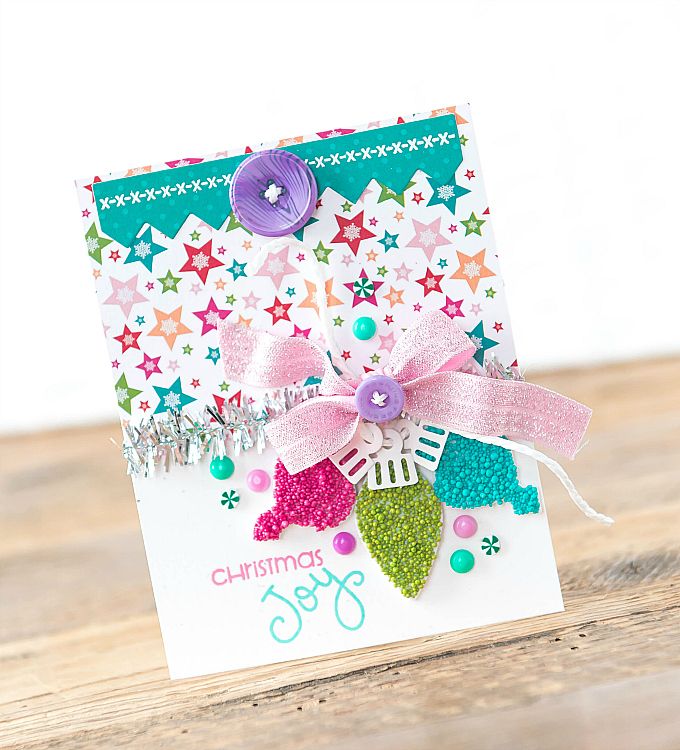
Hi Friends! How are you all doing? I hope you're having a splendid Autumn so far! We've had some cooler days - which has been a welcome change. I've been playing in my craft space quite a lot these days and it feels wonderful! For today's card, I used the Merry & Bright Ornament kit , and this time around I did a bit of a different take on the shakers ;) In every shaker kit, you will find foam adhesive that is perfectly pre-cut to make shaker assembly super easy and fuss-free. What I love the most about these, though, is that the inside foam leftovers can be made into beautiful accents! After assembling a card I featured earlier this month , I had a pile of leftovers, and decided to use the inside bits for this next card. To start, I decked the top of the card using the festive star print, and teal  dots from the kit, cut with PTI's  Banner Border  dies. I stamped and embossed a stitch detail at the top, and added a gorgeous purple button.  I used some tinsel tr...

Sweet Holiday Wishes - Pastel Holiday Card with Papertrey Ink

Image
I've been stamping with a lot of florals lately and thought a Holiday twist would be fun! I was super inspired by Melissa's beautiful pastel holiday creation over on the PTI blog, so I decided to enter the challenge with this little number. I'm sort of loving the switch up of colors and materials here! Such a fun card to make, with plenty of layers. So let's break it down! To start, I stamped a half card base with 1canoe2's Twilight  floral stamp set, in Archival ink colors of Violet, Tea Rose , Sky Blue , Viridian, Leaf Green,  and  Cornflower Blu e. Just at the top and bottom, I added a stitched detail using PR's Positive Thoughts stamp border. I adhered this piece onto a my card base, so it could act as a pocket. On the side of the base, I stamped candy canes, hearts and bonbons and added a few melted Perler beads (tutorial  here ) as well as a dash of Nuvo Jewel drops in Rose Water . Inside the pocket, I tucked in a little tag with more soft layers. At th...

You Mean Everything to Me - Altenew | How to Give Cards a 'Painted' Look

Image
Helooo everyone! Have you been having a good week so far?  I hope all is well wherever you may be!  Over the course of this past year, I've dabbled a bit in different techniques and card styles.  And I've started to realize that some of my cards fall into the traditional style you've all come to know from me, while some have started to morph into a more simple and clean category. And then there is also a third, completely new look for me.  I decided that a fitting title would be "Painted Cards" because they require a tad more artistry, a few more mixed mediums, and at times, a bit of painting. Today's post is all about how to achieve this look.  But do not fret - even if you are not a painter or an artist, these types of cards are so doable.  I'd love to share just a few of my go-to tips here with you today! ______________________________________________________________________ TIP: USING 'PAINTED' PRODUCTS When selecting stamps, in particular, it ...

Festive Holiday Card featuring Queen and Co. Merry & Bright Ornament Kit

Image
Have you started thinking about the holidays yet?  I know it's a tad early, but I've had the most delicious, wonderful parcels arrive in my mailbox and I simply couldn't resist the urge to play! I also love that this time of year, because of our still-colorful surroundings, I am inspired to make bright holiday cards.  Today I'm sharing a colorful number using the Queen and Co's  Merry & Bright Ornament Kit .  It is sooo jam-packed with tiny little trinkets, gorgeous dies, stamps and paper. The ornaments are beyond darling, and for this card, I decided to make a set of stringed ornament shakers. The ornaments are such a great size. They can be used as a single focal point or to be lined up in multiples like this. I used the kit paper pad for all the die-cutting, as well as the trim of gorgeous star paper. Isn't it so festive? Inside each ornament, I added some resin snowflakes (included in the kit), and a few little flat sequins. Just behind the ornaments, I ...